


Decorating cakes is not only a way of making them look unique, but also an art that requires both precision and a sense of aesthetics. One striking and popular decoration method is the drip, an elegantly flowing glaze that gives the dessert a unique character. How do you prepare the perfect drip for a cake? What are the best ingredients and what should you pay attention to in order to achieve a perfectly smooth and impressive finish?
What is a drip cake?
A drip cake is a striking cake decorated with a flowing glaze that forms characteristic irregular icicles on its sides.
This type of decoration is not only eye-catching, but also adds elegance and a modern look to the dessert. Although it may seem like a simple solution, achieving the perfect effect requires the right technique and the right consistency of topping. With the drip, even a classic cake becomes spectacular and the decoration becomes striking.
Drip for a cake | Recipe
You don’t have to spend long hours on intricate ornaments to create a striking cake. Drip is a quick and easy way to give your cake a unique look – it only takes a few minutes to achieve an elegant decoration that will delight your guests. The key to success is the right consistency of the glaze and its precise application.
Drip for a cake | Ingredients
- 100 ml of 30% cream
- 150 g of chocolate of choice
- ½ teaspoon of gelatin
- 40 ml water
Drip for a cake | Preparation
- Pour the gelatin into a bowl, pour over the water and set aside to swell.
- In a small saucepan, heat the cream over a low heat until it comes to a gentle boil.
- Add the previously prepared gelatin to the hot cream and stir thoroughly to dissolve completely.
- Break the chocolate into smaller pieces, add it to the cream and leave it for a while so that the heat helps it to dissolve.
- After a few minutes, mix the whole thing thoroughly until smooth.
- To avoid lumps, pour the topping through a fine sieve into a clean bowl.
- Set aside to cool to room temperature and then chill for about 15 minutes in the fridge, monitoring the thickness.
The finished topping should have a silky texture that flows freely down the sides of the cake, creating the perfect drip effect.
How do you apply a drip to a cake?
After removing the frosting from the fridge, it is a good idea to do a test – apply a small amount to the edge of the cake and see how it flows down the sides. If it spreads too much and doesn’t stop at the right height, chill it again for a few minutes. On the other hand, if the topping is too thick and doesn’t flow freely, it’s a good idea to heat it gently in the microwave for 5-10 seconds to get the perfect consistency.
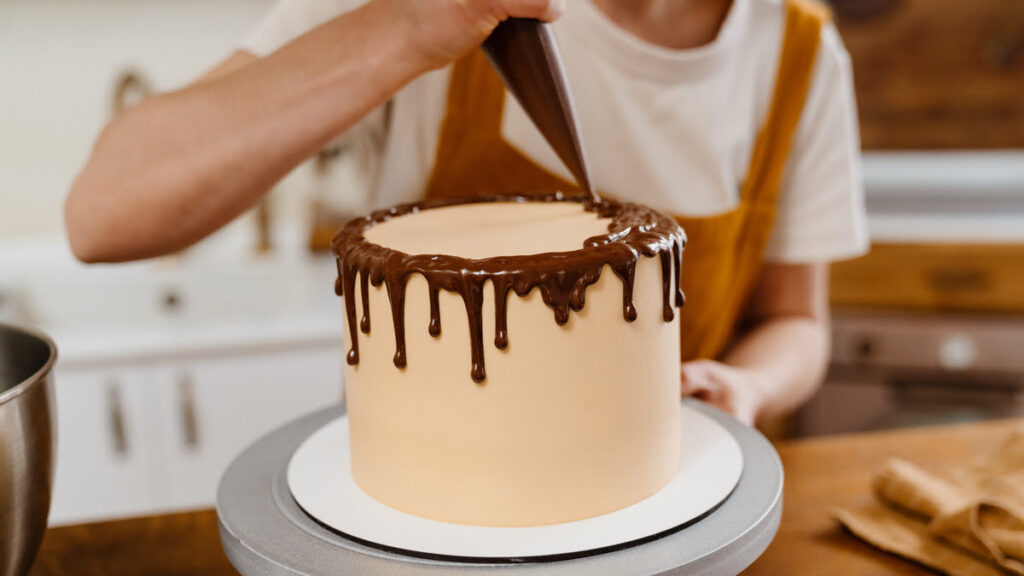
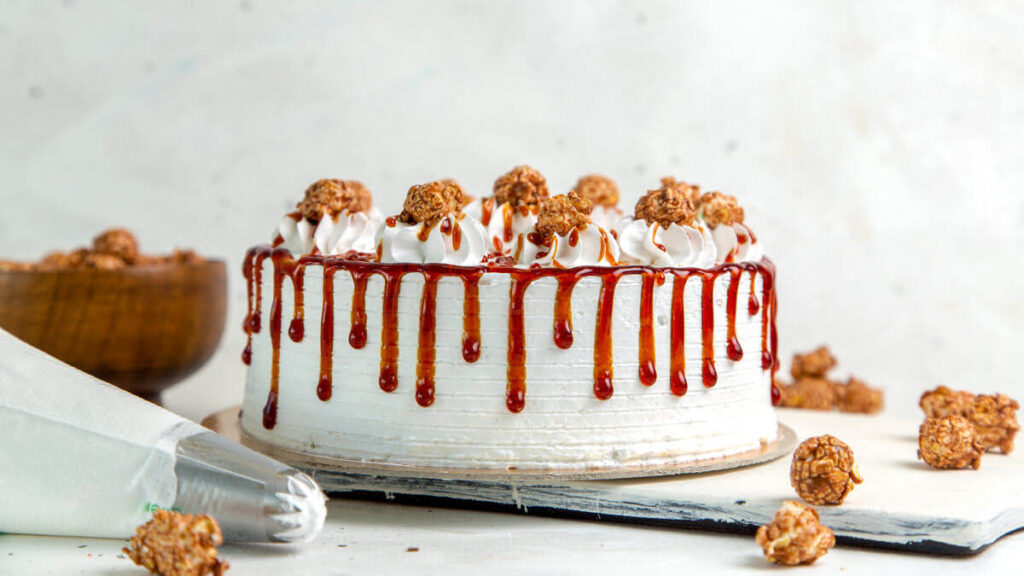
Once the topping has reached the right density, you can start decorating. Drip is applied to the edge of the cake gradually, creating irregular, thinner and thicker trickles. Once you have finished decorating the sides, the rest of the topping can be spread evenly over the top of the cake and smoothed gently to create a striking and elegant surface.
What do you use to apply the drip to the cake?
There are several methods of drip application, and choosing the right technique depends on personal preference and the tools available. It is worth trying out different ways to find the one that will achieve the best visual effect. You can start by decorating the edges of the cake and then spread the remaining frosting on top with a pastry spatula. Alternatively, you can cover the top of the cake first and only then spread the topping over the sides.
Drip application methods
- Piping bag
Piping bag is one of the most precise tools for applying toppings. All you need to do is cut the tip, creating a small opening, and then control the flow of chocolate, allowing it to flow freely down the sides. This technique allows you to easily adjust the length and intensity of the trickles to achieve a variety of decorative effects. - Bottle with dispenser
Special sauce bottles with a narrow applicator are ideal for drip application. Once the toppings are poured into them, the quantity and distribution on the cake can be evenly controlled. An additional advantage is that unused toppings can be stored in the fridge and reheated before the next use. - Spoon
In situations where professional tools are not at hand, a teaspoon can be used. By scooping a small amount of the topping and gently applying it to the edge of the cake, you can achieve a free-flowing icicle effect. The key, however, is to dose the glaze precisely to avoid excessive dripping down the sides.
Each of these methods produces a slightly different end result, so it is advisable to choose a technique that suits the style of decoration and the desired result.
Chocolate drip cake
Chocolate frosting looks best on tall cakes with sides of at least 10 cm. This ensures that the dripping icicles are the right length and create a striking decoration. The final look of the drip depends on your preference – you can opt for evenly spaced icicles of the same length or achieve a more dynamic effect by varying their length. An irregular drip makes the cake look natural and a little more artistic.
Once the glaze has gently set but still remains malleable, additional decorative elements can be added. Sugar sprinkles, edible pearls or gold flakes are great to give your cake an elegant look. For precise placement of the decorations, you can apply them one at a time using tweezers or spread them over the sides of the cake, allowing them to stick to the slightly moist chocolate.
Colorful drip cake
To make a colorful drip cake, all you need to do is to dye the white chocolate to the shade of your choice. The key is to use fat dyes that are designed for chocolate – ordinary food colourings can cause the chocolate to unravel, leaving unsightly patches of pigment.
Colour can be added in two ways – directly to the heated cream before adding the chocolate, or after it has already melted. Regardless of the method, it is a good idea to start with a minimal amount of colouring and gradually dose it out, for example with a toothpick, to avoid an overly intense shade.
If you want a pure white glaze, it may be necessary to use chocolate bleach or white food colouring. This is particularly useful when creating pastel colours, as it allows you to achieve soft and uniform shades.
Black drip, on the other hand, is best prepared with a dark chocolate base. By adding a small amount of black dye or black cocoa, it is possible to achieve a deep, intense colour without using a lot of pigment.
How to make a golden drip cake?
Gold icing is an elegant accent that goes well with both minimalist and richly decorated cakes. It is perfect for glamour, boho or rustic styling, emphasising the unique character of the cake. It can be combined with decorations of live flowers, fruit or sweets, giving the whole look a luxurious touch.
To achieve a golden drip cake, the best method is to paint the solidified glaze. First prepare the classic ganache, make a drip on the cake and chill it in the fridge until it has hardened completely. Then, in a small bowl, mix the gold dye powder with a few drops of spirit or alcohol extract to form a liquid, solid paint.
Using a thin brush, carefully apply the dye to the solidified icicles, trying to cover them evenly. The thinner the brush, the easier and more precise the application. Once completely dry, the gold drip will take on depth and a beautiful metallic shine, blending in perfectly with the rest of the decoration.
When to apply the drip to a cake?
To achieve aesthetically pleasing, evenly flowing icicles, the drip should be applied to a well-chilled cake. The best results come from a dessert that has spent at least 30 minutes in the fridge – a sufficiently low temperature ensures that the topping stops at the edges and does not run off too rapidly.
The temperature of the topping is equally important. It should be around 30-35°C: too warm can dissolve the cream on the cake, causing uneven streaks, while too cold will become thick and difficult to apply. It is a good idea to test the consistency before application by doing a test on a plate, glass or parchment paper. Only by carefully matching the temperature of the cake and the drip will you achieve the perfect decorative effect.
The perfect drip cake | Tips
To achieve the perfect drip effect, it is crucial to refine the consistency of the topping and to apply it at the right moment. Even small mistakes can affect the appearance of the decoration, so it is worth following a few rules.
- Temperature and density of the glaze
The consistency of the chocolate is of paramount importance. A topping that is too thin will drip down quickly and may become translucent, while one that is too thick will form thick, immobile icicles. The optimum drip temperature is 30-35°C. - Test before application
Before the drip is applied to the cake, it is a good idea to do a test on an inverted glass. Pouring a small amount of the topping over the edge of the dish will allow you to check how it flows and whether you have achieved the desired effect. If the consistency is right, you can start decorating. - The cake must be well chilled
Drip is always applied to a cold cake, immediately after taking it out of the fridge. This allows the topping to set more quickly, so that it does not absorb into the cream or melt too much. - Controlling the amount of topping
The length of the icicles depends on the amount of ganache poured. For short decorative lines, a small amount of topping is sufficient. If you want the icicles to flow closer to the base of the cake, a little more chocolate should be applied in that area. - The right proportion of cream
If there is too little cream, the chocolate may become hard after setting and start to crack. To avoid this, it is a good idea to use tested proportions. A ganache that is too thick can be easily corrected by adding 1-2 tablespoons of warm cream and reheating it.
Attention to these details will result in the perfect drip, which will add a unique character and a professional look to the cake – just like from a pastry shop.